Thursday, April 15, 2010

Homemade Doughnuts


Mmmmmm :)

So, thanks to Kalina I am now obsessed with The Pioneer Woman's blog. I stayed up until 3:00 am reading her Black Heels to Tracker Wheels romance. It will make your heart go pitter patter. Please read it if you have not already. I know, I'm like the last person on the block to hear about her. Bought her cookbook. Love it. Love her.

Anyway, the recipe is here.

Don't let the darkness of these doughnuts worry you. They were not hard, burnt, or in any way unsatisfying. I cut the recipe in half and what you see is how many it made minus a doughnut or two that I ate (or 3).
Posted by Picasa

Easter Goodies


I made these makeup bags for my sisters and my mom for Easter and filled them with grass and chocolate. It was a very easy, very rewarding project. I used home decor weight fabric from Etsuko Furuya's Fall 2009 fabric. The pattern came from Sew Pretty Christmas Homestyle. I bought the book from amazon used for just 3 dollars and it is just full of cute patterns for Christmas, or really anytime of year, if you just use non-Christmasy fabrics. It has everything from quilt patterns and advent calendars, to cute teddy bears, dolls, and house shoes. She uses some surprising decorations that aren't very traditional but they seems like they are. She is Australian and I believe this book was printed in the UK. Which means, no seam allowances are in the patterns.

This purse pattern uses such a small amount of fabric. I bought four fat quarters and made 3 with it. And I have enough left over to make another.
Posted by Picasa

Aviary Quilt

Here are a few more photos so that you can see the details, if you like.


Her back side looks pretty nice, too, don't you think?!
Posted by Picasa

Aviary Quilt


Here is the finished front side that was machine sewn, and there is no visible seam.


Here is the back where I hand-stitched it together using the very useful blind stitch that my brilliant friend Kalina showed me.


And hereis the beauty!
Posted by Picasa

Aviary Quilt

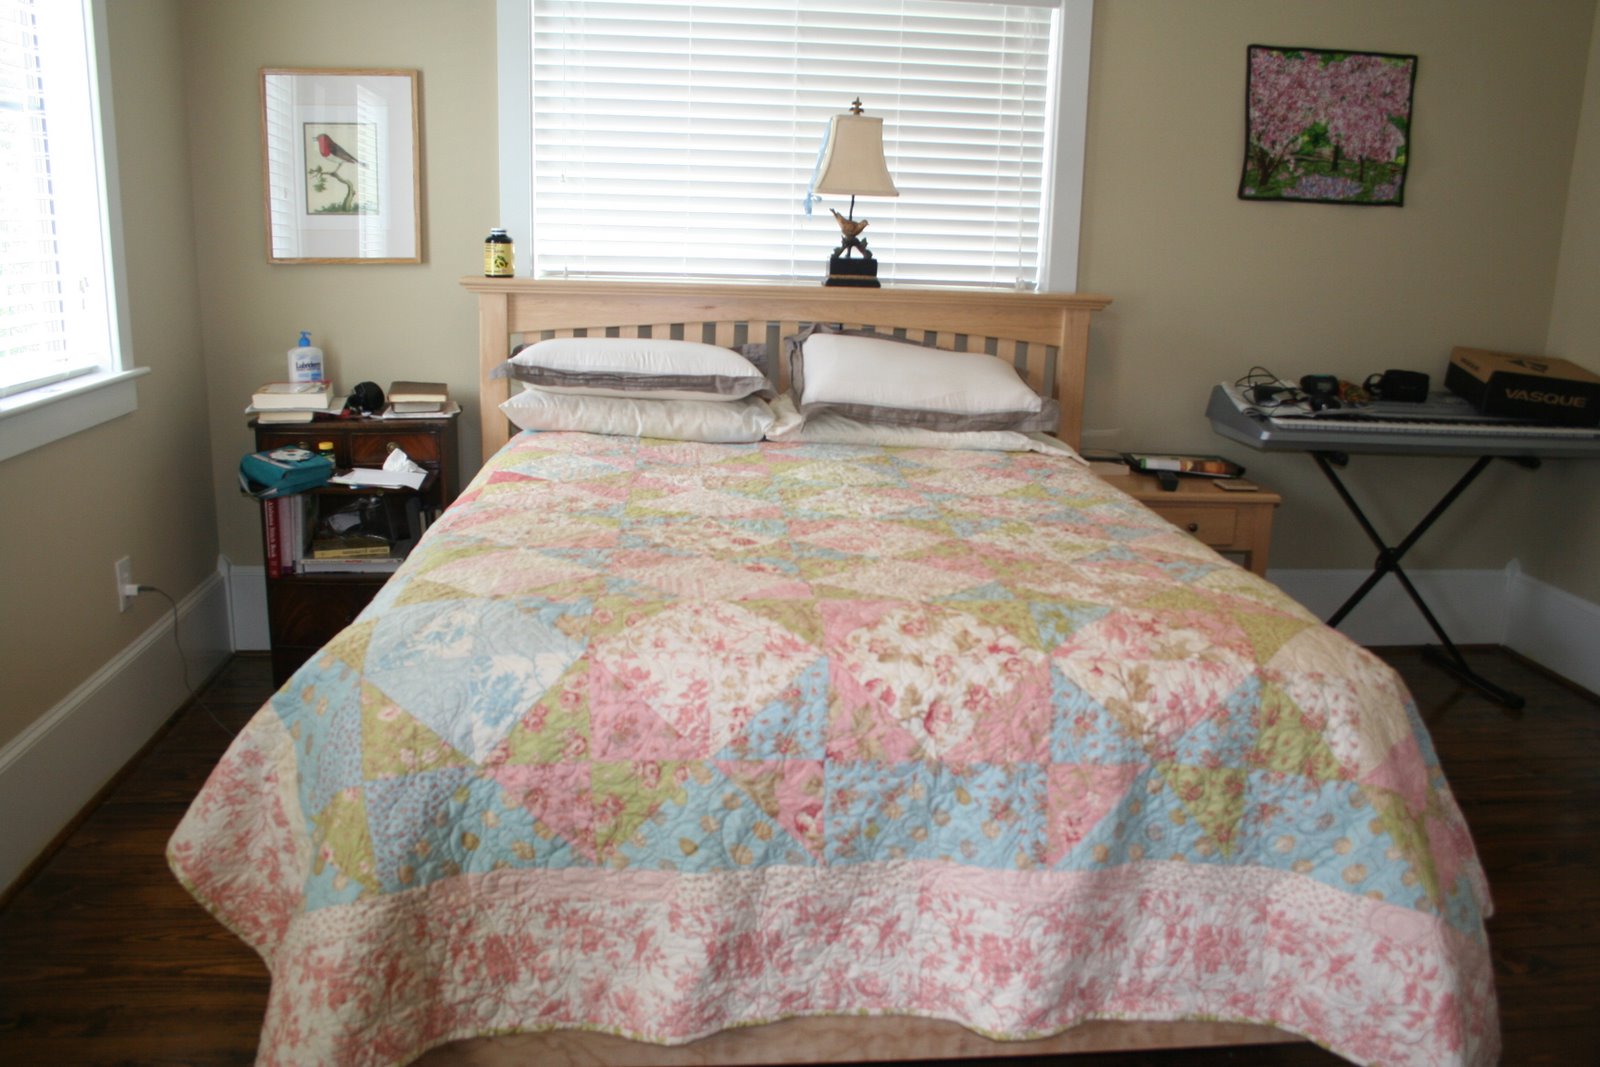
I FIANLLY finished my Aviary Quilt and I must say that I am very pleased with it. It is not perfect. The corners do not all match up properly. Its a little bumpy in a few places. And the notes from my quilter after she finished were not words of encouragement telling me how amazed she was at my finery and skill with a sewing machine, or how perfectly each individual block was placed - that there was not a finer layout; each piece was placed in precisely the very spot that would put it in harmony with all the other tones and colors it would be conjoined with (a matter I put a LOT of time into). But it is mine. It is my little creation, and I wanted to share it with all of you. Including a few of the methods, which were all obtained through various blogs, books, and better sewers than myself.

Here we go -

First of all, I must make a special note of the inspiration for this quilt. This beautiful, sweet fabric I found with Jen that one day we went to that glorious candy-store-of-a quilt shop. I loved the little eggs with the little speckles and their names. I bought a yard, having no idea what I was going to do with it. (ever done that before?? Yeah - I do it all the time, too.)

I started with 2 bundles of layer cakes (each piece was about 10" x 10"). And I used just about all of them. I separated them into stacks of lights and darks, first. This is important so that there are rather distinct rows or darks and lights in the finished product. Then, I made pairs of squares from each stack in attractive groupings. I took the two squares, placed one on top of the other and I cut them twice, from one corner to its opposite diamond corner. I had 8 triangles cut from the 2 layer cake squares. I paired two triangles of one pattern with two from the other, sewed them together, and ended up with 2 full squares again.
After I made all of the squares, I placed each piece in the meticulous manner mentioned above. Then I took note of all of the egg patterned material pieces I would need to fill in the border and cut and placed them with the rest. I began sewing, one diagonal strip at a time, then connecting them to each other as I went along. In the picture you can see the rows I had already sewn in strips then attached together in the bottom left corner. In the middle is the diagonal row I just finished which I am about to attach to the rest. And then the top right corner are all the individual squares ready to be connected to one another.
That's the basic body of the quilt. I then did a couple of borders to make it the size I wanted, and to get the look I wanted as well. I did a small border made from the strips of a jelly roll. And I did a much wider border with the pink toile I love so much. There will be a pillow made from the fabric . . . someday.

To show you how I did the binding I have a few self-explanatory photos. First, I stumbled upon this nifty little tool that I have since fallen in love with. Seriously, I am trying to think up projects to do, just so I can use this little thingy. I think it is called, oddly enough, a binding maker. Not sure, but that's what I call it. This is a 1/2" binding maker, which means you need 2" strips of the fabric. You put it through one end and when it comes out the other, it is all folder in this perfect little bi-fold piece of heaven. And you just iron it as it comes through. Makes life much easier. Although, as I gather from my readings, this is not the most sturdy of binding methods, so keep that in mind if you are making something that will get a lot of washing and you want it to last a long time.

My mother-in-law introduced me to these quilter's clips. They were very helpful in having a strong hold on the pieces while they waited to be sewn together. But, I did find that I rather liked the glass head pins much better when it came to actually sewing. Just my preference from my meager experience as a novice quilter. I am sure I must not have been using them exactly right because, as I sewed, the binding would get pushed and bunched up and I'd have to re-clip over and over again. Maybe it was a tension problem?? Not sure. But the pins elevated the problem, so I went with them instead.


After the binding was complete, I put it right-sides facing each other, against the front of the quilt. Make sure to place it about 1/4" - 1/2" from the raw edge. I sewed along the top edge of the binding, the edge closest to the raw edge of the quilt, as close as possible to the edge of the binding. Then, you just flip it over to the back and hand sew it together with a bind stitch.

Posted by Picasa

Saturday, March 27, 2010

dots


Don't you just love these earrings???? I adore them! They were a surprise from happyasaclam and I feel quite like that happy little clam wearing them right now! They are beautiful! Does she know me, or what?! Please, if you have not already, stop by her shop and check out her beautiful designs. The craftsmanship is excellent. They would make a great gift - for yourself ;) Thank you, Ketti! LOVE them!

I made this tunic recently with this sweet dot fabric I found on sale at Sew, Mama, Sew!
The pattern can be found here. You all know how I love Sew Serendipity patterns. This one is from the Juliet Tunic. I used sleeves from my latest sewing book . . . photos and projects to come later.
Posted by Picasa

Monday, March 22, 2010

SALE!


jcarolinecreative.com is discontinuing its fabric selection and has major mark downs on beautiful fabrics. I ordered 10 total yards of the cotton supreme solids (pictured) plus some peacock ribbon. All for just $23. Look how beautiful the colors are! And the fabric feels just beautiful! This is a real bargain. I just got these in the mail today and am so happy with them that I ordered a bit more today. You have to build your stash when the price is right, right? Well, if you are interested there are still a lot of colors and prints and canvas options left.
Posted by Picasa

Spreadable Strawberries


Well, I made my first successful batch of home canned goods all by myself. I went with strawberries, they are my favorite food. I have had a hard time finding a canning pot with a rack in a decent price range. I'm told it is not the season for it. So, I sat with my head in one hand, the basic canning kit my mother-in-law got me for Christmas in the other, feeling a bit discouraged. Then I had this great idea! I have a multi pot (if you don't have one I highly recommend them!) and it has a really deep sitting pasta insert that could easily be used as a rack. Well, it was a bit space constrained for anything larger than these tiny 4 oz. jars. But, I had already bought them, as Adam and I have thrown away so many jars of homemade jelly that was only half eaten because it goes bad before just the two of us can conquer it. I found that it held 5 jars just right. Until I find a better canning pot, this is working swimmingly.
Does anyone have any suggestions? I'd love to hear. And any cool canning experiences, recipes, or advice you have. I'm just getting started with this domestic self-sufficiency.

This recipe is found here on MarthaStewart.com, and I follow it with the canning instructions. I doubled the recipe and got these twelve 4 oz. jars and a little extra that we ate right away.

Ingredients

Makes 1 3/4 cups

  • 1 quart hulled strawberries
  • 1/2 cup sugar
  • 2 tablespoons fresh lemon juice

Directions

  1. In a food processor, process strawberries until coarsely chopped. Transfer to a large skillet and stir in sugar and lemon juice. Cook over medium-high, stirring frequently, until jam is thickened and bubbles completely cover surface, 9 to 10 minutes.
  2. Transfer jam into prepared jars (they need to have been sterilized by boiling them and still warm). Leave about 1/4 inch headspace. Remove air bubbles if necessary. Wipe rim. Have prepared the sterilized and still warm lids and bands. Center lid onto the jar and screw band down until resistance is met, then increase to fingertip-tight.
  3. Place jars in canner, ensuring they are completely covered with water. Bring to a boil and process for 10 minutes. Remove canner lid. Wait 5 minutes, then remove jars and let cool for 24 hours, and store.

Posted by Picasa

Saturday, March 20, 2010

Panel Napkins


Have you ever noticed those cute book panel fabric prints? I have seen a few and wondered what else I could do with them. My mother's birthday was approaching and I walked the aisles of the quilter's shop looking for inspiration when I noticed a bunch of lovely Beatrix Potter fabrics. My mother loves her stories and artwork. Well, I thought about a few different things I could make, but I needed something that wouldn't take too long because her birthday was just a few days away. These are what I came up with.

I made her these Beatrix Potter napkins. I bought one yard of fabric which completed the panel, there were 12 different scenes from the Beatrix Potter books measuring about 11 x 11. I also bought 1 yard of coordinating Beatrix Potter fabric for the back of the napkins. I layered the 2 fabrics on top of each other, wrong sides together, and cut out each scene with my rotary cutter and set them aside. I also bought 1/2 yard of tiny floral printed fabric for a decorative binding. I cut them into 2" wide strips and made the bias tape. I then proceeded to frame each napkin with the binding. Easy as pie!

What do you do with these adorable and unique prints?
Posted by Picasa

Friday, March 19, 2010

Loving Amy Butler's Love


I finished this dress a while back but I haven't been able to wear it because of the cold and rainy winter we've had. But spring is approaching and its time to whip this baby out!
I bought this fabric from Amy Butler's Love line and thought it would make such a lovely Easter dress. I pulled apart an old dress that has been traveling around with me for 3 years unworn. I made pattern pieces from each piece and came up with this dress. I somehow lucked out and did not have to use a zipper!

The dress is 3 pieces: 1 solid piece for the back and 2 for the front. To make room for my size b's I made the empire waist with two tucks or folds. This helped give it form, and made room so that I could skipp out on the zipper.

I'm working on a top right now that has this dress' same basic form.

The Juliet Tunic
Here it is.

To add sleeves, just use a sleeve pattern from another pattern. With this dress I needed to make my own sleeves because I did not have a pattern I could use. I wanted to do a tutorial on how to draft your own sleeve pattern but, honestly, I do not remember how I did it! A little bit of luck, some tape measure, and mostly just going for it and hoping it turns out wearable!
Posted by Picasa

Thursday, March 18, 2010

Cherry Blossoms and Goldfinches Triptych


I got a commission to do a cherry blossom and goldfinch triptych based on a similar watercolor painting from my etsy shop. The client, happyasaclam, has her own shop where she uses recycled sterling silver, among other things, to design and create beautiful jewelry. You should definitely take a look at her shop. Each piece is unique and sophisticated.

Last night, at 3:30 am I could not sleep because I had all these ideas for the painting and I just had to work on it. By 8:30 I was happy with what I had done, and could declare it complete. :)
I wanted to share the finished product with you all. They're each 11 x 14 and will be framed above her bed, individually.


Above is a picture showing you how each connects to each other.


I must say that the pictures really flatten out the color, and I believe they look a lot better in real life. The cherry blossoms are based on photos I took of the cherry trees in the Jardin du Luxembourg in Paris.
I hope she, and you, enjoys them!
Posted by Picasa

Sunday, March 14, 2010

Homemade Book Plates


I found this really great blog: The Graphics Fairy.
It is a blog dedicated to providing beautiful, vintage, free clip art with ideas for using them. There are so many images that I love. One in particular was a set of vintage images that she made into bookplates. Which I used above. I bought label paper from Online Labels. This is a great site where you can buy MANY different types and sizes of label paper, and in a variety of colors. It is also great because you can buy them in bulk, or just buy exactly as many as you need. I used a piece of light blue label paper, the label being the entire sheet so I could cut them according to their different sizes. I wrote in my email address and name with a pen.

Monday, March 8, 2010

Baby Birthday

We celebrated my daughter's first birthday over the weekend. I did two tiny crafty-ish things for her party that I thought I'd share.

She has a stuffed bear that she's had since she was 4 months old, from our camping trip in Yellowstone. She loves this bear. Sleeps with it, talks to it, snuggles it. It's her lovey. I made her a little bear cake for her party by baking a cake in two 9-inch pans and cutting the snout and ears out of one of the rounds and frosting them onto the other round. I realize there are much better bear cakes out there, but this was my little attempt.


I also made a photo banner for a decoration. I took pictures of her from the day she was born and one for each month of her first twelve months and sewed them all together with a zig-zag stitch, leaving 3-4 inches in between each one. I made two strands, since they wouldn't all fit into one in the space I wanted to use. It was really simple and cute and easy and a nice way for guests to see how she's grown in the past year.

Thursday, March 4, 2010

Making your own stamp - **Update


Kallan came over the other day and, so generously, with all of these supplies to show me how to make your own stamp! I couldn't believe she did that for me! She got me started on this stamp and I have to say it was SOO fun! All sorts of ideas were coming as we made this: making your own stamp to print your own fabric with was my favorite. I have wanted to make my own printed fabric for a while and learning this was the shot in the arm that relationship needed!! ;)

thanks kallan

this was so easy, I think all of you scrapbookers out there should give this a try.
Posted by Picasa

Monday, March 1, 2010

Candied Pecans


I've tried a few recipes for candied pecans and this one is my favorite. They come out nice and shiny and the sugar isn't too overpowering. Put them on salads, ice cream, or just eat them plain! Make one batch and you can snack on them for the next two weeks.

2 1/2 cups pecan halves
2 tsp vegetable oil
1 cup granulated sugar (I usually use less because they lose their pecan flavor)
3/4 tsp salt
1/4 cup water
1 tsp vanilla extract
candy thermometer (optional)
wax paper

Mix pecans and oil and spread out on a baking sheet. Bake for about 20 minutes at 300 degrees. The pecans need to be cool before you can do anything with them. In a saucepan, stir sugar, cinnamon, salt, and water over medium heat until sugar dissolves. Using a candy thermometer or the Soft Ball Test to boil the mixture to 236 degrees. Then turn off the heat, stir in the vanilla, and stir in the pecans until well coated. Using a slotted spoon or fork, transfer pecans to wax paper and separate them (a lot will be stuck together). Let them dry and then enjoy!

Soft Ball Test: After the sugar mixture boils for a few minutes, drop a small amount of it into a glass of ice cold water. If it forms a ball and is soft enough to roll around with your fingers, it is the right temperature.